Lots of people may want to be clothes designers. They try so hard, but they just can't seem to sell much. I help out people by telling them, but what I remembered, the Times lets you post pictures! So here are some step-by-steps to making some face parts:
(Akbar is sick as I am writing this, so the sizes and colours may not be exactly right)
Size 1 can be used for contacts.
Size 2 is used mainly for lips.
Size 3 is used mostly for shirts. Editor's Note: Akbar says, fill up the window at this size, and keep it to chest and higher. No tummies!
And Size 4 is used mostly for hair and hats
Also, never make the parts too big or too small. This is where the Preview button comes in handy.
If you recognize your item in the picture, thanks for letting me use it.
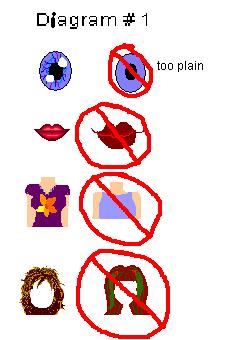
You see how plain and boring the red crossed-out ones are? You see how detailed and good the ones on the left are? Ok, so how do they get so good at doing that? I will tell you how.
People can have the most trouble on hair. Here are my step-by-step instructions:
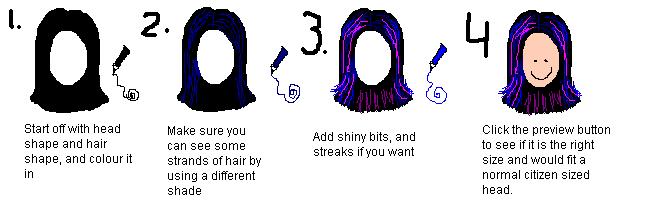
Now this is only how I, myself, do it. Maybe some people who are really good at making face parts have better methods, but this one will do.
Now, that wasn't hard at all. It's not the detail that people have trouble with. I think it's the shape. I used to mess up on the face shape, or make the full hair shape too big. But don't forget, even if you do badly, add some detail because you may be creating the latest trend.
Anyway, ciao!
Twigsy
